

Many years ago, I had the idea of dressing our then-only-child up as a cowboy. Ahhh, I have vague, happy memories of life with just one kid. He was about 20 months old and we had quarter horses at the time, so this seemed like a natural theme. Not satisfied with the selection of reasonably priced kids' chaps (is there even such a thing?), I decided to make my own. After much consideration, I went with a soft, very lightweight microsuede and made a pattern along the lines of rodeo chaps, so there wasn't a lot of excess fabric behind an early walker's knee. I always got a lot of compliments on his outfit, and with our three-year-old daughter set to enter a western-themed pageant next month, I thought it would be fun to make a pair for her, too. She of course wants her chaps to be pink and sparkly. I wanted to share the step-by-step process with you here - if I can make these, anyone can! These are look-alike enough that you could use them in a leadline or pony class, but they only cost me $8 to make. I sewed these by hand in about four hours, but if you're unlike me and brave and competent with a sewing machine, you could make these in no time.
Start by taking a few measurements. You'll need the child's outseam (waist to floor), inseam (crotch to floor), waist, and thigh circumference. Make sure you take measurements over boots and jeans, just like you would with real chaps. Figure out how much fabric you'll need - I got away with half a yard because I opted to make both ends of the back panels (the part that wraps around in back above the knee) snap on and off rather than leaving it as a solid piece.
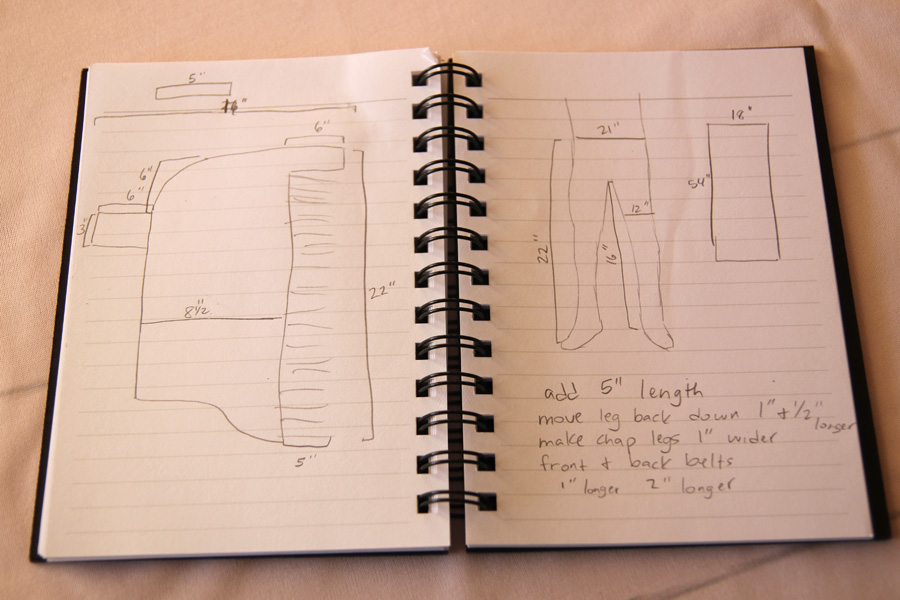
Mostly because I forgot about that part and bought fabric before I measured, and my fabric wasn't big enough to fit the back panels on in one big piece. Oops! Master seamstress I am not. Our fabric store had both pleather (leather-like vinyl) and microsuede - of course real leather would be wonderful but pleather is $8.99 a yard and you can actually sew through it with a regular needle. I also bought sew-on snaps (size 2) but velcro would be a good choice too. If you use snaps you'll need ten to sixteen snaps depending on how you add the back panels. Ignore my crazy notes on the right.
Cut out a piece of fabric large enough to fit one half of your chaps (one leg piece). You can choose to keep the inside (opposite the fringe) of the back panel attached to the chap leg if you have enough fabric - you'll save yourself having to sew on six snaps. And you'll thank me for that later. I didn't have enough but it was an easy fix making separate panels. Draw the shape of the chap leg onto the back side of your fabric - I used a stick of pastel chalk since I had it on hand. Remember to make your pattern a little larger than your measurements, because you'll be hemming the edges under around the chaps. Make sure you include the fringe - that starts out as part of the solid panel. (My photos don't include the back leg panel - the small, perpendicular piece in the sketch - but if you have the fabric for it, draw it right onto your main panel and hem it along with everything else.)

Cut out the basic shape, and then lay the chap leg right side up on your other piece of measured fabric. Trace around the cut out leg onto the back side of the fabric to replicate the shape in a mirror image. Cut out your second, reversed leg.


Pin back the outside edge along the back belt of the chap, and down the inside of the leg. Sew this in place, and then hem and sew the bottom of the chap up to the line of uncut fringe. And don't mind my ugly hemming job - I always figure no one's going to see the back side. Except now you have - just pretend that's nice and even, okay?


If you're doing the back leg panels separately, now's the time to make these. Cut out the size needed and hem the long ends. Then hem the short ends and sew three snaps on each of the ends (mine only show snaps on one end because I wanted to remeasure before I committed to a second set of snaps, but I added them right after). If the panels are already attached to your main chap leg, you were very smart. You only need to add a set of snaps to the one unattached end. I'm still lamenting my decisions a day later.


Go ahead and snap on the opposite sides of your snaps onto the snaps you already sewed on.
Make sense of that one, I dare you!
Basically, snap the two sides of your snaps together just like they'd be if both sides were sewn onto fabric. Then rub chalk over the protruding nubs of the backs of the snaps, and press them down onto your fabric where you'd like the back panels to sit. I found that placing the back panels about halfway between the child's knee and crotch is best, so as not to interfere with movement. An easy way to measure this height is to simply hold the chap panel up against the child's jean-clad legs and place a pin in the chaps at the appropriate height. Then you can sew the backs of your snaps onto both sides of the chap legs, snap the back panels in place, and you're finished!


Well, with that part anyway. But the end is near!
The final piece we need to make is the front belt. Take a strip of fabric about an inch and a half wide and hem the long sides (or you can also fold it in thirds with a slight overlap along the center, and sew a line down the middle to save yourself a step. I was feeling lazy and went with this method.) Hem and sew the ends, and then sew a snap to both ends (note : these two snaps do not snap to each other, be sure to use two different sets of snaps!) Then add the other side of the snap to each of the chap legs up near the top curve of the chaps - you'll want this to sit a couple of inches lower than a belt would. I'm talking about the single snap along the upper left edge in the photo.

Finally, sew two snaps onto the back belts of the chaps so that they snap together to fit your child's waist. I had to fiddle with mine a bit to get a good fit - there's quite a bit of overlap so I added a second snap. Alternately you could add two snaps together at the end if your chaps fit more snugly.

Here is the finished product, unadorned. I actually went back and sewed in a second, tighter snap on the front belt because as you can see, these were a little large - my model was highly uncooperative during the measuring process. I had to bribe her with candy to take these photos. I am not above bribery. With the front belt adjusted, the gap at the top should be gone and the legs will face forward a bit more.

I'll be adding some suede flowers and silver beads to make these stand out - that post will come later! My fingers have taken enough needle stabbings for one day. I think these will be darling over a pair of pink jeans and with her soon-to-arrive pink belt and shirt.
I'm going to have to stock up on candy before trying for those photos.
No comments:
Post a Comment